STAGE I: Microgreen Biomass Analysis
Part of Microgreens in Gravity
Stage I: Microgreen Biomass Analysis
Stage II: Microgreen Tropisms and Root Architecture Analysis (coming soon)
Stage III: Simulated Microgravity Phenotypic Analysis (coming soon)
Suggested Prior Reading
Table of Contents
Introduction
One of the critical components in space crop research focuses on factors that are related to edible biomass. Essentially, how much time, energy, and resources are needed to produce given quantities of edible plant-based food? This stage in the AIRI program seeks to isolate variables that affect edible biomass in microgreens while also identifying developmental patterns such as dwarfing. The main protocol set outlines how to collect data at three given points in development regarding average specimen height and eventually total edible biomass. This stage is able to be scaled to include additional data points associated with average canopy area analysis.

Why Microgreen Biomass?
Plants grown in long-term space missions will need to produce nutrient dense yields with minimal energy and space requirements. While microgreens may not be a future space farmer’s main source of food, they may be an integral source of vital nutrients. In the first stage of “Microgreens in Microgravity“, the goal is to identify microgreen biomass variation based on growth conditions. At a basic level, this may be measured with a controlled biomass measurement after a defined growing period. As an extension, canopy area measurements may be taken. The data collected in this stage may identify growth patterns between microgreen species that would direct future space-flight experiments.
Stage I Protocols
Investigation Supplies
- Hamama kit, or
- Standard “1020 Planting Trays” (This can be substituted by using a tray with a depth of 5-6 cm (2-2.5 in)
- Standard lab weighing tray,
- Petri dishes
- Epicollect5 application or browser website login (both are free)
- Paper or digital science journal
- AIRI Bio-Imaging Spectrum Sticker
- Two seed types need to be grown in parallel for comparison
- Growing media (options include seed quilts, potting soil, vermiculite, perlite, or plain water)
- Dry Seeds (Any species can be used. See supplementary tables for a guide on difficulty levels)
- Ambient temperature thermometer (meant to measure the temperature of the room)
- Digital Scale (sensitive to 0.1 grams)
- Water mister or spray bottle
- Camera or smartphone
- Label or Tape
- Permanent Marker
- Ruler and/or a Printable Color (Red) Scale (The red scale is included with the Easy Leaf Program Download files, however, a red 2cm square serves the same purpose)
- If canopy area analysis is included in your investigation: Computer capable of running the Easy Leaf Area Program (if you have an Android device you can get instant measurements and/or save photos for analysis on a computer or for sharing with your fellow researchers)
Stage I Microgreen Planting Protocol
Use the Hamama kit instructions, or:
- If not using the kit, please precisely record any variations in your protocol using your “Science Journal”
- Fill a single tray with dry soil and weigh (Record the weight of this tray and use it as a reference for subsequent trays)
- Weigh appropriate amount of seeds for selected tray size. (For small seeds, such as Mizuna, a 2g measurement is usually used per standard planting tray.)
- Utilize the microgreen density calculator to measure ideal seed quantities
- Add tap water to the growing trays (soil should be damp, not wet/flooded)
- Evenly spread the seeds across each tray, with one species or cultivar per tray (Seeds can also be spread in rows within the same tray. If multiple seeds will be represented in single trays, it is important that each row is clearly defined).

- Evenly spread the seeds across each tray, with one species or cultivar per tray (Seeds can also be spread in rows within the same tray. If multiple seeds will be represented in single trays, it is important that each row is clearly labeled)
- If using potting soil or another loose media, gently scatter some media on top of the seeds. Seeds shouldn’t be covered completely so make sure this is a light dusting of media. One way to do this is to put some of the dry media in a flour sifting sieve and tap the side to create a light dust over the seeds.
- Mist the finished trays with water
- Make sure to label each tray with the seed type, date planted, and elevation
- Place trays near a light source (windows or LED lights are acceptable; be sure to specify the light source in the data sheet)
- Mist soil daily to keep it damp. If the media dries out, record this in the journal.
Data Points to be Collected
Participants of AIRI Program 1 Stage 1 are to keep a separate science journal, digital or paper, with the following data points collected on the 4th, 8th, and 12th day after planting. Specimen photos are to be taken during all observation days as well.
Complete list of data points to document prior to entering data in Epicollect:
- General Observations
- Sowing date
- Weight in grams of all seeds planted
- How many days after planting were first seedlings visible
- Plant type (species and cultivar)
- Growing Method (soil, soilless growth media, hydroponic)
- Lighting Type (40% Red 60 % Blue LED, Red/Blue Plant Grow Light, White Output Plant Growth LED Bulb, Incandescent Light Bulb, Direct Sunlight, Diffused Sunlight, Red LED, Blue LED, White LED, Other)
- Photo Period (hours of light per 24-hour day)
- Ambient room temperature in celsius
- Specimen height (in centimeters)
- Leaf Area (Optional depending if canopy area analysis is being conducted in your investigation, see Easy Leaf Area below)
- General Observations: Participants should record observations regarding all data points collected as well as qualitative records regarding the following points:
- Rate of growth
- General plant health
- Growth distribution within a given growing tray
- Plant color development
- Edible biomass weight (in grams)
- Canopy Photos (Follow included photograph collecting protocol)
Stage I Data Collection Protocol
Data is to be recorded on the 4th, 8th, and 12th day after planting. All data is to be entered in the “AIRI Microgreen Growth Biomass Analysis” data collecting form through the Epicollect 5 app or browser website.

NOTE: For educators utilizing AIRI with young learners unfamiliar with fundamentals of data collection and analysis, we recommend utilizing the Kids in Data program. Not only does this free program provide engaging methods to teach data literacy through the use of video games, it also introduces concepts related to online safety and privacy.
Epicollect 5 Data Input Application Setup
Epicollect5 is a mobile and web application for free and easy data collection.
This application is utilized by universities, students, and researchers around the world. Data sets are open source and are able to be downloaded by anyone who is participating. The data that is entered into the AIRI related questionnaires will populate the various AIRI data visualization tools. These tools are meant to be used to compare data sets and experimental variables in real time. All visualizations are open source and able to be downloaded for free.
The simplest way to upload experimental data is through the mobile application. Both the mobile and browser app setup and data input steps are outlined below.
Epicollect5 browser Application
- To utilize Epicollect through your browser, first go to https://five.epicollect.net/ and make a free login profile.
- After logging in, search for “AIRI MICROGREEN GROWTH BIOMASS ANALYSIS”
- Select “View Data”
- Once in the view data section, new data may be added by selecting the “Add” function on the right side of the page.
Epicollect5 Mobile Application
- Search for and download the free Epillocect5 app through your mobile app store.
- Create a free login account (this can also be done through the browser app)
- Once logged, select “add project” and search for “AIRI MICROGREEN GROWTH BIOMASS ANALYSIS”
- After selecting the project, select “+Add Entry”
- After all data points have been entered, there will be a finalizing option to upload data, and upload photos (along with other file options). Select to upload data and photos.
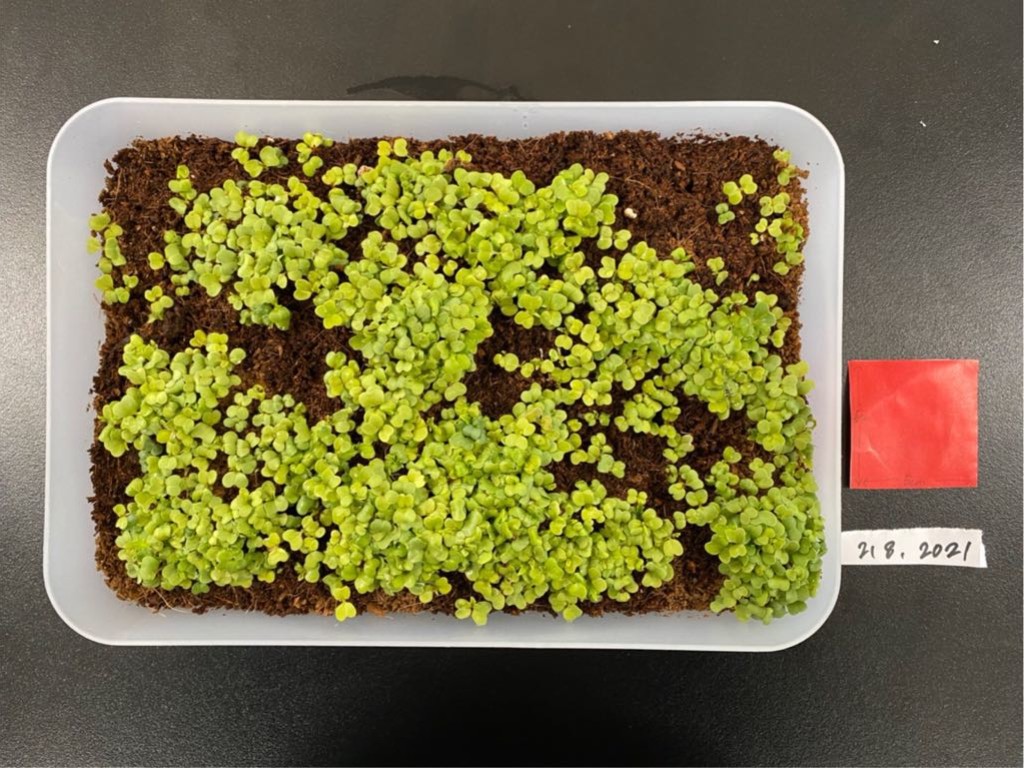
Photographic Microgreens Protocol
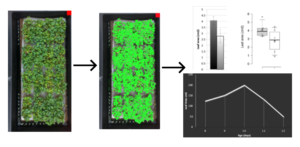
- Print and glue red square scale onto white cardboard or paper
- Place a red square scale next to the tray so that the entire square scale is visible. This scale can be downloaded from the Easyleaf free program download or it can easily be made by making a red square of a known length (usually 2cm2).
- The AIRI Bio-Imaging sticker can also be used
- Photograph the tray at a distance of 45 cm from the top of the tray
- Upload and label photographs with plant name, date, light treatment, and time the photo was taken
- Take photos on the 4th, 8th, and 12th day after planting
Measuring Height Protocol
- Place ruler at soil level
- Using a second ruler (this can also be a pencil or a firm piece of cardboard) find the highest point of the plant in the microgreens tray
- Record height measurement in centimeters in the data collecting spreadsheet template
- Do this on the 4th, 8th, and 12th day after planting
General Observations Protocol
- Include notes in the general observations template document, under the appropriate sections for:
- Ambient temperature at the time of recording
- Elevation
- Date and Time of observations
- In the template observations document participants should record observations for all data points collected as well as qualitative records regarding the following points:
- Growth rate
- General plant health
- Growth distribution within the growing tray
- Plant coloration
- Do this on the 4th, 8th, and 12th day after planting
Edible Biomass Measurement Protocol
- After all observations have been collected on the 12th day after planting, record the edible biomass measurements in the general observations document (list each tray separately)
- Harvest microgreens by removing them from soil media then cutting them at the base of the plant (just above the roots) A good way to do this is to use scissors. Cut the stems right above the soil line as close to the root as possible.
- Measure each separate tray harvest in grams and record these measurements then input them along with the other corresponding data points in the Epicollect5 data sharing application.
Stage I Easy Leaf Protocol
What is Easy Leaf Area?
- Easy leaf area is free, open source, software that rapidly measures leaf area in digital images (photographs or scanner images). Easy leaf area uses the RGB value of each pixel to identify leaf and scale regions in each image.
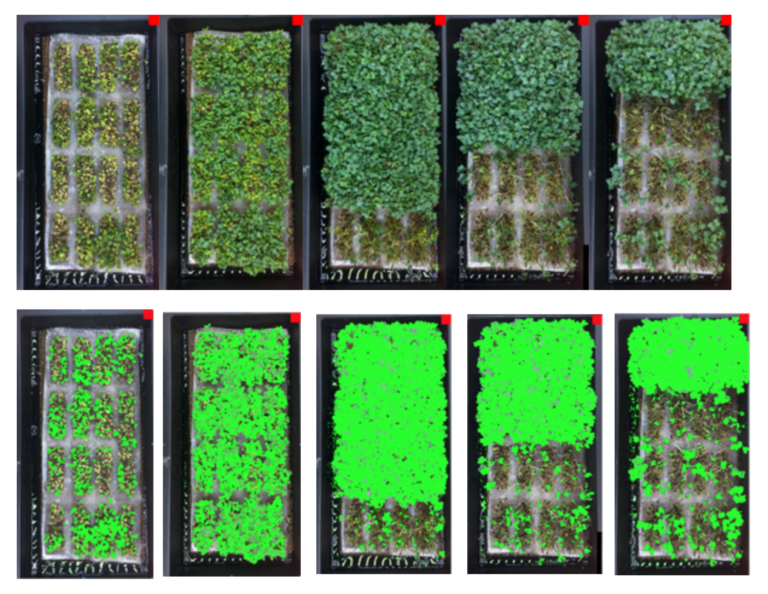
Getting Started with Easy Leaf
- This program analyzes single jpeg or tiff images or batches of images for leaf area.
- Images must have a red scale of known area in the image in the same plane as the leaves for the program to use as a reference scale (This can be added in Photoshop or other “Paint” software packages).
- Download and install Easy Leaf Area on a designated computer or Android device application. This software runs on Android as an app or can be used with images moved to a PC, Linux, or MacOS.
- Follow the instructions on their website: https://github.com/heaslon/Easy-Leaf-Area